

By Leland Toy
Vol. 7 No.5 – Sept. – Oct. 1984
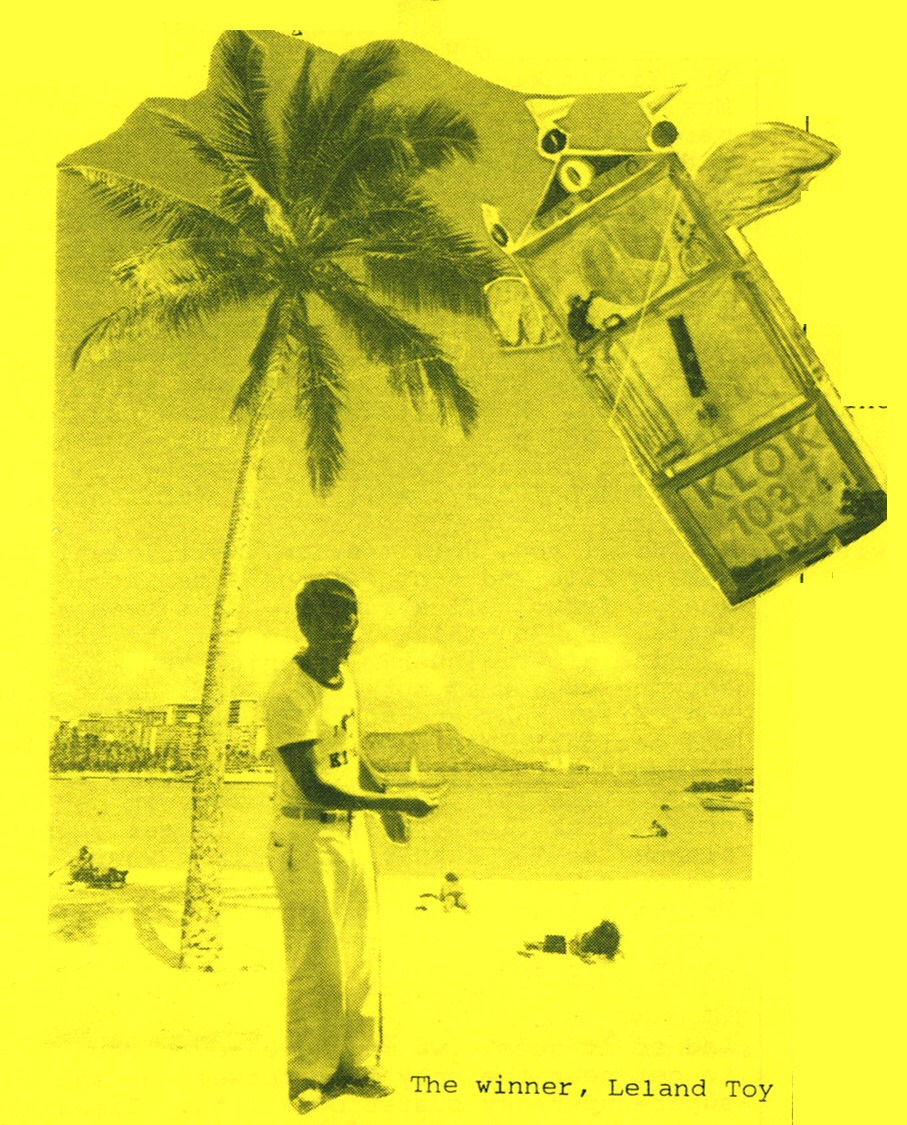

If all goes as planned this issue of KITE FLYER is being brought to you on the gentle tropical breezes over the warm sandy beaches of Maui in Hawaii. Thanks to my winning KLOK kite and KLOK-103.7 FM and Kitemakers of Pier 39 who co-sponsored the June Father’s Day kite Festival. This kite was chosen to be the best flying KLOK kite by the audience attending the festival. It was a run off between Neil Thorburn’s stunting “STUBBY ‘W” kite which he flew on 4 lines and my flying grandfather’s clock, complete with wings and a pair of joggers legs in tennis shoes.
Not your everyday clock. There were also a couple of mice painted on the clock, one listening to a Walkman Stereo and the other one calling up the station on a telephone. This radio station has it’s listeners help decide what it should play, by calling up and voting YES or NO on a particular song. When the judges finally narrowed the field down to Neil and I they asked the audience to make the decision, I felt like I was at the Colosseum in Rome, unfortunately for Neil they thru his kite to the lions. As Neil walked off in defeat he muttered something about that he had to start eating more rice if he wanted to win any kite contests in The City. Better luck next year Neil.
There were plenty of other creative entries in this contest, after all this is San Francisco. Dan Prentice came decked out as a rock star, complete with a kite reel made out of an electric guitar, the only problem was his kite couldn’t decide whether or not it would fly. Carol Henry, aka Mrs. Kite coordinated her outfit to match her kite. She tried to WOW the judges with her creative use of Barbara Strisand records, unfortunately they must own stock and decided it was an un-wise move on their part if Carol would win,even though, and I must admit,it was a striking ensemble. I particularly enjoyed the little gold crown perched on the album “COLOR ME” which Carol wore on her head. Better luck next year. Diana Aurigemma from Seattle did not -know about the contest but said “wait until next year” I guess the word is out. Get out your kitemaking materials and get to work.
NIGHT FLIGHTS A SUCCESS
Lots of kite flyers were out Saturday Oct. 27 for B.A.K.E.’s Halloween Night Kite Fright. A big THANKS goes to George and Marion for getting the ball roll— g and taking care of the table and illumination for the evenings pot luck. Lots of goodies were brought out to share and it was good to see some of the B.A.K.E. members that ONLY come out at night.
Brock Parsons lit-up’Rainbows still are in position number one as the most spectacular display. This time Lewis Lewandowski of Richmond, CA brought along a portable generator to make life a little easier. Lew’s Mrs. manned a bright spot-light which was also hooked up to the generator to shine on other air borne objects. Lee Toy came decked out in some black and red wings with a 13 ft. wingspan, but there wasn’t quite enough wind to get him off the ground. Carol made quite a hit when she dressed up as MRS. TOM HENRY, aka as Mrs. Kite, Neil couldn’t recognize her, and tried to sernade her to San Jose with an Elvis Presely imatation of Blue Hawaii he sang and played on his ukulele, all while flying one of his tyvek wonders. Tom Caldwell had his newly finished Bat kite out with some fancy sewing work. Tom came down early with a whole stable of Halloween kites, from his Penta-Pumpkin face to his Skull and Crossbones Rokkaku. Gordon Wong and friend came across from Alameda and long lost Sam Urner came down from Sacramento. Cory Jensen and Co. drove up from Santa Cruz, they enjoyed the fly so much that they organized one for their flyers down at the beach. Mike Saba with Kitemakers of Pier 39 flew a large delta with luminous monster heads dangling from the flying line. He later gave away the heads to anyone brave enough to take it off the line.
The other Mike and Cherie were missing and presumed Trick-or-treiar75-Ehat evening. High above the gathering crowd flew a white ghost kite to watch over the festivities.
Fly by nighters Sunny, Rick, Phil and Barbara dropped by on their way to a costume party dressed as a Witch, Mr. Tom Henry, a cook and a girlfriend. It was quite a turn out for a rather chilly and light wind evening. Mr. Lee came with a box of firecrackers to end the evening with a bang….
HAPPY BIRTHDAY ANSEL TONEY
Ansel Toney, the kiteman of Farmland, Indiana will be celebrating his 97th birthday on Dec. 12, 1984. Ahearty congratulations and many more to a wonderful and generous man. If you would like to send Ansel your greetings, his address: The Kiteman of Farmland, Indiana R.R.1, Farmland Indiana 47340.
KITE ENCOUNTERS OF THE FIRST KIND
WHEN:Some years ago.
WHERE: In a tiny bunglow in No-where’s-ville, Middle America. Home of Mr. & Mrs. Kite. Curtain rises, A fireplace casts a warm glow into the living room. A color TV set is in the corner with a wilted African Violet on top. Mrs. Kite sits on an orange and green plaid davenport with her hair in curlers, reading the National Enquirer. At her feet lies a small brown package. Stage right we hear a door open and close. Off stage we here Mr. Kite: Hello Honey I am home.(In walks Mr. Kite taking off his jacket.)
Mrs. Kite: Hi Sweetie…gee I thought you were the UPS man. Did you have a busy day cleaning microscopes?
Mr. Kite: Oh the usual, lots of ‘squid brains’ on the road, clogging up the intersections, they never learned how to use their turn signals. What did you think about today?
Mrs. Kite: Oh, just what I was going to fix you up for dinner. I did take a walk down to the laundrymat, why did you know it’s exactly 3/4 of a mile, I measured it with my pedometer. (Mrs. Kite reaches down for the package and holding it in her lap) By the way this package came for you today, it’s from THE SLIPPERY LADY, who is SHE, one of your old FLINGS????
Mr. Kite: No, No..it’s..er..well I wanted to make a kite and sent off for some fabric and gee..I forgot all about it. It’s been a while. Do you think I could use the sewing machine after dinner, I mean,do you mind showing me how it works so I can make a kite? Mrs. Kite: What are you NUTS, men can’t SEW, and besides kites are for KIDS. (Mrs. Kite flings the package into the fireplace and exits stage left, shuffling along in her bright pink fluffy slippers) Now get yourself cleaned up for supper, I’ve fixed your favorite, Corn Flake Rutabaga and frozen broccoli. Mr. Kite slumps into the davenport, head in hands watching $40 worth of spinnaker cloth go up in smoke.
curtain
And so it goes…we men have never been able to get near the only tool between us and a super-duper-sky buster of a kite. Times have changed and now your wife or girlfriend are asking you if THEY can use YOUR machine to sew something. (is this a sexist article?)
Our reply is..”well..I’ve got this one set for very ‘thin’ material, can’t you use your old one?” Having purchased the latest model for kites, her old ‘stand-by’, the one you learned on, sits in the corner gathering dust.
Actually many more men are sewing kites these days than you might think. With the intrduction of George Ham’s Parafoil in the last issue of K.F. we have gotten a few questions from the beginner machine sewer for a Beginning Sewing SPINNAKER Cloth Kites, 101.
GET AQUAINTED WITH YOUR MACHINE
Read the manual that the manufacturer supplies. There is a wealth of information there. If you don’t have a manual, go down to your local sewing machine shop and get a book on sewing in general. If you are fortunate enough to be married or have a girlfriend (or boyfriend) who sews have them teach you the fundamentals. How to thread, how to change needles, where and what a bobbin is and how it works. If the machine has not been cleaned or oiled in some time, do it.
George uses an old Singer 201, the ones they taught a zillion girls how to sew a French seam in 1906, actually 1939-1958. He also uses a Singer 1591, both models are straight stitch only, no zig-zag. They do have a reverse but George doesn’t use it. Ansel Toney used to use a treadle machine, he has since been presented with a Pfaff 1222E which he has adapted to quite well.
Regardless of what type of machine you find yourself using, approach it like a finely tuned engine. Without the proper amounts of fuel, air and spark the engine won’t run. In sewing it’s the thread, needle and the bobbin tension which are essential.
BOBBIN TENSION
The thread and needle are obvious, if one or the other are missing, you cannot sew. It is the bobbin tension, like the carburetor (that mixes the air with the fuel), that mixes the thread with the fabric. Bottom tension is controlled by the bobbin case, this is the case that the threaded bobbin sits in. A rule of thumb states that a fully wound bobbin when threaded correctly in the bobbin case should fall slowly when held by the end of the thread. There is a small screw on the bobbin case to control the tension, by tightening the screw you increase the tension by, loosening it you decrease it. When ever you change thread weight (size) you should check the bobbin case tension to see if it is correct.
THREAD TENSION
Once you have set the bobbin tension you can adjust the top thread tension to produce the correct stitching. Here’s what the VOGUE SEWING BOOK says:
The upper tension controls the thread that goes through the needle. If it is too loose, the thread on the underside of ‘our stitching will appear to lay flat on the surface of the fabric (1). Should the thread appear to lay flat on the upperside of your fabr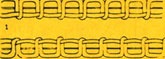 ic, the upper tension is too tight (2). The ideal stitch is when the thread tensions are in balance and both threads are drawn equally into the fabric (3). To test further, hold the fabric at both ends of the stitching line and pull sharply until one of the threads breaks. The color of the broken thread will usually indicate which tension is too tight. If both threads require more force to break and break evenly, the tension is balanced. No matter which tension is wrong, the correction should always be made by adjusting the upper thread tension. Do not adjust the bobbin tension until you have exhausted all other methods possible.
THREAD
George uses a #46-100% polyester commercial grade sailmaker’s thread. You will most likely not. The thread to avoid, as Margaret warns us in her writings is the 5 spools for a dollar, bargain basement special, they’ll just give you a headache. A good quality thread is Suisse-Long Fiber Polyester, for Topstitching and Buttonhole Twist. A #50 cotton covered polyester is OK, but it does produce lint, which must be cleaned from the machine periodically.
NEEDLES
George swears by the German needles made by Schmatz, the Universal, #14. George doesn’t think he needs to change them until they break. He had one needle in the machine for six months before it went belly up on him. For hand work George imports his needles from Mexico, known only by “XXX” they are tapered rounds #3 or #4, and they are the best. One tip in threading the needles, George recommends a bit of bees wax on the finger tips to flatten the thread before you try to thread the EYE. The eye of the needle is flat and long, not round, a waxed, flat end thread will go thru a lot easier than fuzzy, wet one.
PRESSER FOOT TENSION
This one is still a mystery, the tension adjustiment is usually on the head of the sewing machine. It effects the way the material is fed through the machine. The best way to determine the correct tension is by trial and error. Once you have adjusted the thread tensions, try working with this adjustment. Sometimes you need not touch it.
STITCHING
What you hope to accomplish is a nice flat seam whose threads are interlocked at the mid-point of the fabric. This is very difficult to achieve on spinnaker cloth. When you adjust thread tensions, start out with a piece of cotton-polyester and fold it double or triple thickness, then single thickness. Start all over again with a triple layer of spinnaker cloth and then work down to two layers. Each time you run some test stitches, check the bottom stitching, it should look similar to the top. Refer to “THREAD TENSION” for help. Sometimes the type of thread you use will create puckering of the spinnaker. If this occurs try a different thread. Nylon thread does this, try to avoid using it.
BACKSTITCHING
George does not like to use the reverse mode on his sewing machine, he says that it doesn’t sew the same. He will turn the work around and sew forward. George also uses very small stitches 13/inch when backstitching.
SEAMS LIKE A GOOF UP
George does not build kites to wear and so does not prescribe preferred dress-making techniques, rather, if it helps the areodynamics of the kite that is what should be used. In the first article on the parafoil several seams and “right” side, “wrong” sides were given but incorrectly. Specifically Vol. VII No.4 Pg. 6,Re:
FRONT and BACK covers, the rolled hems will end up on the “right” sides not , as the dress-makers would have them on the “wrong” side. Also the stitching of all rolled hems will occur as close to the “inside”
edge of the hem as possible and not down the middle. When the pieces are put together the seam will be placed in the middle. Please make a note of this. If you have already sewn the ribs and covers, not to worry they will be fine, use them the way they are.
OOPS A LA
Tom Caldwell would like to correct another error that appears in the article “DISH PAN HANDS” Vol. VII No.4, Pg.7. The sheet vinyl should be .030″ and not 1/16″ thick. Also the Mylar vanes are .5 mil and not 1 mil.
KITES FOR EVERYONE
Kites For Everyone by Margaret Greger, 1984 136 pgs. Soft bound. 8-1/2″ x 11″ $10.00 Kites for Everyone is the Betty Crocker Cookbook of kites for beginner kitemakers as well as advanced kitemakers who find themselves in the position to teach a kite making class. Thirteen kites with over 40 varaiations on a theme are presented between the covers of what is the combination of three earlier kite books Margaret has published (Blown Sky-High, More Simple Kites and Simple Fabric Kites), plus brand new kite designs to test out.
Well illustrated by Madel Greger, the book is easy to read and work from. Margaret has made a name for herself as the “workshop” expert and she shares her expertise with you in this book. Although most of the kites are what you might call “quickies” the introduction of fabric kites will present a challenge if you have never sewn a kite before. Margaret adds a KITE DIRECTORY to help you “program” your kite making by assigning a difficulty rating to each design. You could start off with a No. 1 rated Paper Bag Snake, then a No. 2 rated Trash Bag Delta, graduate to a No.3 rated Paper Dutch Kite and top off your skills with a No.4 rated fabric Facet Kite.
Kites For Everyone is now available, just in time for the holidays, $10.00 plus $1.00 shipping from Margaret Greger, 1425 Marshall, Richland WA 99352
If you hurry you may get a collector’s item, a limited number of books were printed with the back cover photo UP-SIDE DOWN.
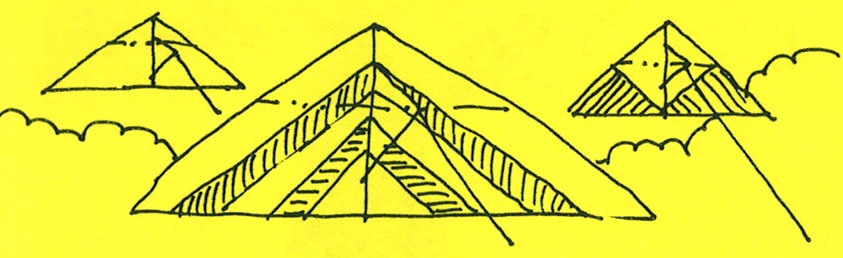
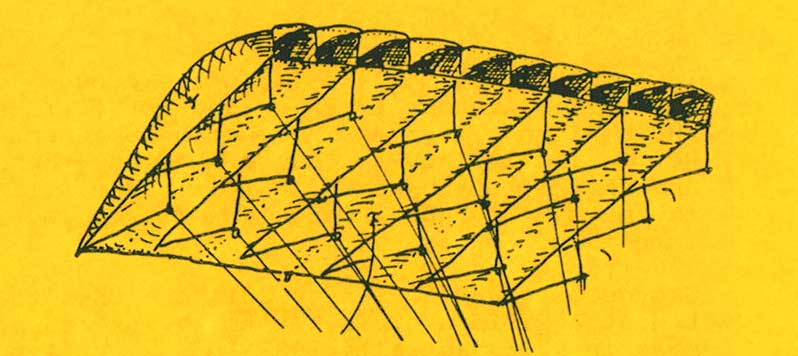
GEORGE HAM’S PARAFOIL – PART II
 In this installment, we’ll proceed with the hemming and “bridle tab” insertion to the FLARES. We will also start sewing the ribs to the front cover and then the flares to the front cover. In Part III we should finish sewing the back cover on, sewing the trailing edge and attatch the bridle. Try to be pa tient and not get ahead of these instructions, there are some subtle details of construction that are important.
FLARES
The flares on a parafoil do three things:
1) They hold the bridle on the kite.
2) They help shape the kite.
3) They provide lateral stability.
Sewing the flares and inserting the bridle tabs the way George makes them are easier DONE than SAID, but here goes
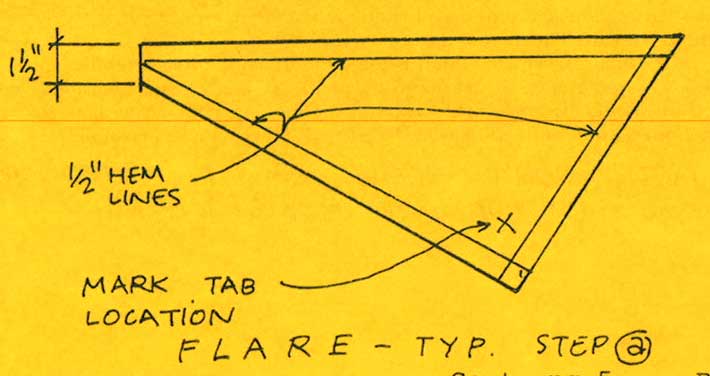
We will be making three “right side” flares and three “left side” flares for each row of flares. This means that you hem three on one side and three on the opposite side. It is difficult to tell which end of the flare the tab goes in, so it is best to maIk the corner.when you lay out your 1/2″ hem lines.
BRIDLE TABS
From 3 yards of 1/4″ braided nylon webbing or equivalent, cut 18 – 6″ lengths. George recommends shoe laces or corset ties if you have trouble finding the 1/4″ braided webbing.
HEMMING THE FLARES
a) Mark 1/2″ hem lines and tab locations.
b) Fold corners noted, hold with Glue-stick.
c) Roll 1/4″ hem and crease with fingers.
d) Insert webbing as noted, leaving 1/2″ tab for attatching bridle line.
e) Pin and baste and then sew, see plans.

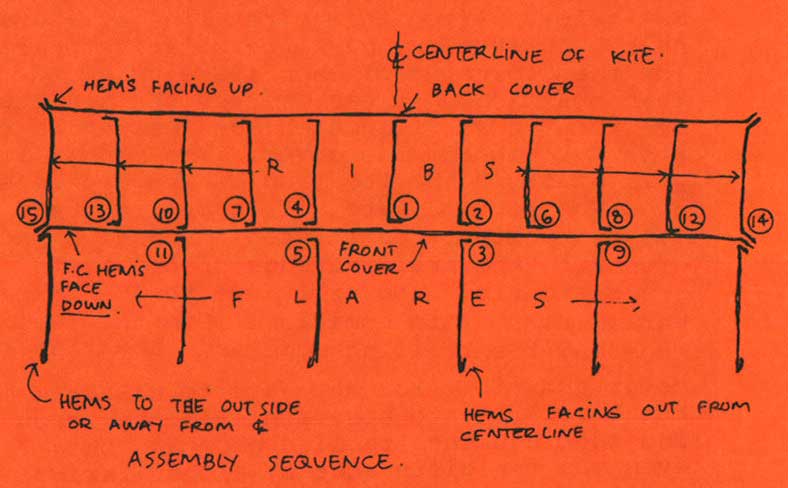
ASSEMBLY SEQUENCE FOR ATTATCHING RIBS AND FLARES TO FRONT COVER
Numbers in circles indicate the order of assembly. Note “right” sides of pieces are determined by positions of the 1/4″ rolled hemms. Again, George does not intend to wear the kite but to fly it. The exposed hems may seem backward to dress-makers.
HAM’S TENSIONING PULLEY SYSTEM
Theoretically all pieces have been cut exactly, and should fit without a problem, unfortunately this isn’t the case. Even George has to “EASE” the pieces together at times. When fitting a rib to the cover, George uses the following:

This device allows him to tension the two pieces so that their ends will match. He can adjust the length of the “reach” by moving his foot. The tension on the piece is controlled by the movement of his knee. This system frees both of his hands to pin the pieces together. This system is used while pinning
the bottom chord of the rib to the inside of the front cover and also when pinning the top of the rib to the inside of the back cover. It is not used when putting the flares on.
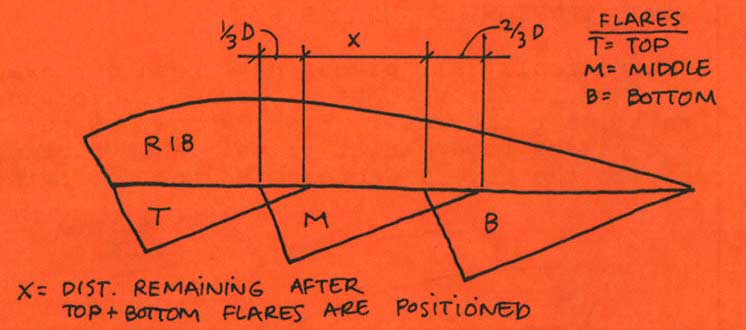
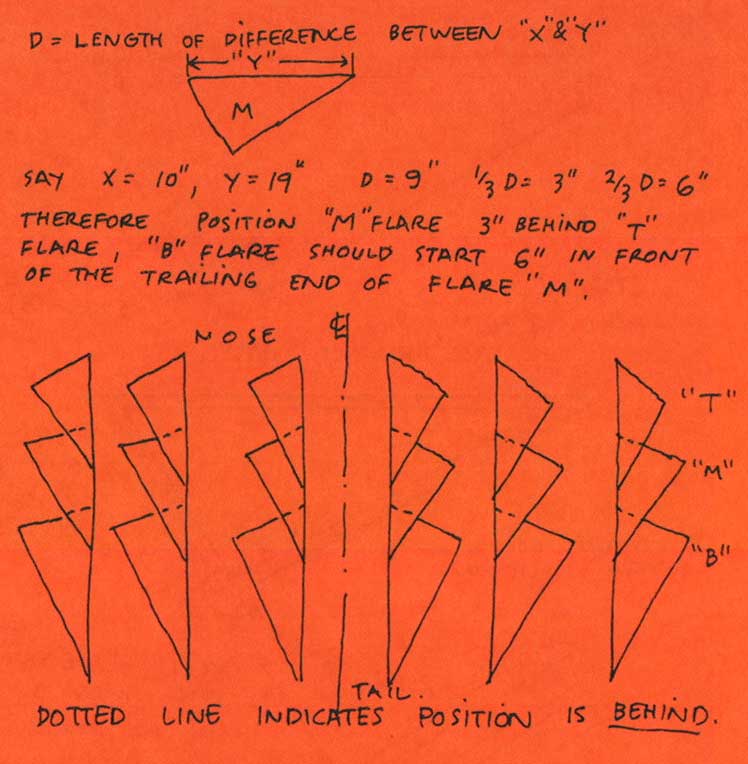
FLARE POSITIONS
As I mentioned before the flares are very critical, their positions will determine the shape and location of the pull on the bridle. Note the relative position of the overlap, like roof shingles, each directs the wind into the next set. The vertical position along the chord of the kite will be set by the first line of flares sewn in step
See below. After this first line of flares have been sewn in, mark the relative position for the beginning of each flare as noted. When positioning these flares, the top row, or “front row” will match the leading edge of both the rib and the cover. The middle flare will start at the location determined in step. The bottom flare will start at the location determined in step 0 and will end even with the trailing edge of the front cover and rib. You will have to “EASE” the bottom flare into position. Pin the leading edge and the trailing edge and take tiny tucks
cover and rib. You may have to EASE the bottom flare into position. Pin the leading edge and the trailing edge and then even out the difference by either taking small tucks in the cover or the flare.
NOTE: When sewing assembly steps: 1,2,3,6,8,9, 12,14 and 15 you can sew from the nose to the tail. In steps 4,5,7,10,11 and 13 you will sew from tail to nose. This sequence is designed to reduce the total amount of “kite” that must pass thru the sewing machine arm in order to make the seam. Note: Ribs and Flares are sewn at one time for steps 14 and 15. When ever you overlap flares, backstitch about 2″ in length.
Hopefully this isn’t too confusing, good luck I’ll see you when I get back from the Islands. Aloha
By way of standard reference–KITE FLYER is available six times a year (weather permitting) at the inflated cost of a dinner for two at DOGGIE DINER–S8.00/year. Gift subscriptions are available, so let your friends know what they can get you for Xmas. Send all money, trading stamps or gold bars to: KITE FLYER, 1883 Grand View Dr., Oakland, CA 94618